

Container Information
Why Should I Paint my Container?
Well here are a few reasons why you should. If you’re buying a used container, you cannot select a specific color, but if you’re buying a new container, you may have the option to select your preferred color. If your container will be used for storage on your property where only you will see it, the color probably doesn’t matter as much to you. However, if your container will be used as a shed, garage, or additional residential or business space, you might want the exterior to match the other buildings near it.
CONSIDERATIONS FOR PAINTING
Cosmetic Reasons
You’d like the shipping container to look fresh and new or, you want to match it to its surroundings. You’re not satisfied with just removing the labels and getting rid of the rust spots – you’re looking for a nice, clean, and polished appearance.
Extended Life Span
Painting your container can protect it from harsh weather and help slow the corrosion process. Quality paint will extend your shipping container’s life and improve its appearance, if that’s important to you.


3/4" Tongue & Groove Flooring
FREE Delivery & Setup within 50 miles
5 Year Manufacturer's Warranty on Craftsmanship
Limited Lifetime Warranty on Metal
Prepping the Surface of Your Container
Good
If you’re more concerned about protecting your container from the weather than how it looks cosmetically, the “good” approach should be enough.
- Pressure wash the entire exterior of the container to get rid of surface dirt or mud.
- Let the container dry thoroughly after washing.
- Once dry, apply the chosen paint with a pneumatic paint sprayer or roller that can be bought or rented at Home Depot, Lowe’s, Sherwin Williams, or other similar stores. Five gallons of paint should be enough for one coat on 40-foot and 53-foot containers. Three gallons will be plenty for a 20-footer.
- Let the paint dry, and you’re done.
Better
If you’re going to use your container in a more high-profile area, you may want to spend more time on surface prep
- Pressure wash the container (maybe even twice).
- Remove any labels and stickers on the container.
- Removing any rust spots by using a wire brush.
- Once you’re happy with how it looks, you can then paint the shipping container with another coat or two until it looks a little more vibrant.
Best
If you really want your shipping container to look sharp, you’ll have to go the extra mile in preparation. What that really means is that you’ll need to work harder to get every spot of rust and label off before painting. You’ll definitely want to use a sprayer instead of a roller when you paint to get better, more consistent paint coverage. Using the sprayer will also save you time, as you can do a coat of paint in 30 to 40 minutes with a sprayer.
SIZE & DIMENSIONS
| Container Size | Exterior Dimensions (LxWxH) | Interior Dimensions (LxWxH) | Door Opening (WxH) | Square Footage | Typical Weight (Empty) |
|---|---|---|---|---|---|
| 10-Ft Container | 9'9.75" x 8' x 8'6" | 9'3" x 7'8" x 7'10" | 7'8" x 7'5" | 75 SqFt | 2,850 lb |
| 20-Ft Container | 19'10.5" x 8' x 8'6" | 19'3" x 7'8" x 7'10" | 7'8" x 7'5" | 150 SqFt | 5,050 lb |
| 20-Ft High Cube | 19'10.5" x 8' x 9'6" | 19'3" x 7'8" x 8'10" | 7'8" x 8'5.5" | 150 SqFt | 5,181 lb |
| 40-Ft Container | 40' x 8' x 8'6" | 39'5" x 7'8" x 7'10" | 7'8" x 7'5" | 300 SqFt | 8,000 lb |
| 40-Ft High Container | 40' x 8' x 9'6" | 40' x 8' x 9'6" | 39'5" x 7'8" x 8'10" | 300 SqFt | 8,775 lb |
SITE PREPARATION
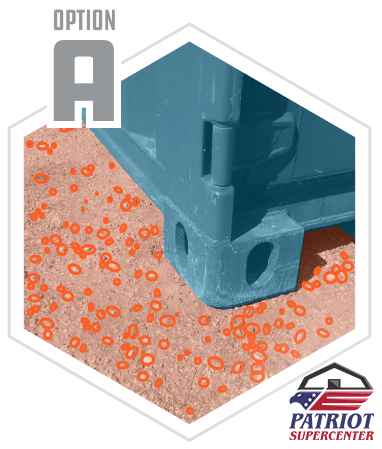
GRAVEL PAD
Although containers can be set directly onto level soil, the steel on the bottom of the container can rust when exposed to prolonged moisture. Care should be taken to keep the steel structural elements dry. Placing the container on a gravel pad is preferred, as it both keeps the underside of the container dry, and keep the container at ground level for easy access.
If you decide to create a gravel pad, Please remember to size it generously:
12′ x 25′ for a 20′ Container
12′ x 45′ for a 4 0′ Container
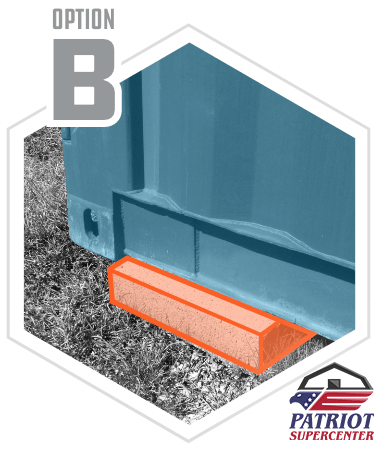
CAP BLOCKS
If gravel isn’t an option, the container can be also placed on Concrete Cap Blocks in order to raise of off the ground and get airflow underneath the container to prevent corrosion. The driver will help you position them as the container is being unloaded. Make sure to purchase the 4″ thick version, as they are less likely to crack under the weight of the container.
Please inform the driver if you plan to set the container(s) on blocks before it is unloaded. Once on the ground, we are no longer able to position under the container.
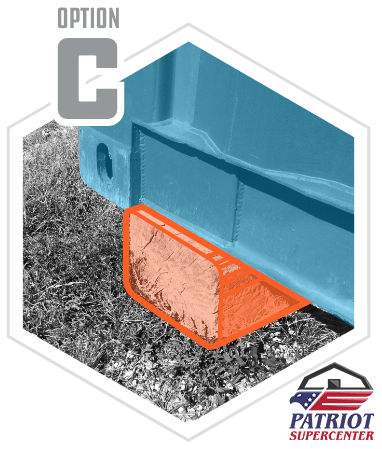
CROSS TIES
Also commonly known as a railroad tie, a cross tie placed at either end of the container will do a satisfactory job of providing stability and air flow. Keep in mind that cross ties are wood and will deteriorate a lot faster than container. You might find yourself 10 years from now wondering how you are going to lift the container to replace the cross ties.
Please inform the driver if you plan to set the container(s) on blocks before it is unloaded. Once on the ground, we are no longer able to position under the container.
Purchase Options
We've got you covered! Whether you're planning on buying your barn or storage shed outright, or sign up for our rent-to-own program!
Delivery & Setup
We offer a smooth & hassle-free delivery experience, delivering your shed 50 miles one way at no additional charge, and we set up & level your new shed.
Unmatched Quality
Our trust is founded on our promise to exceed your expectations. It can be seen in every structure we create and deliver.